Small Bathroom Tile Ideas: What Actually Works in Tight Spaces
Practical small bathroom tile ideas from a tiler with 44 years experience. What makes a small bathroom feel bigger, what makes it feel smaller, and the rules that genuinely matter.
Most of the small bathroom tiling advice online is wrong, or at least incomplete. The standard advice — use small tiles, use light colours, keep it simple — isn’t always right. Sometimes the opposite works better. The key is understanding why each rule exists and when it applies.
This guide is what I tell clients during site visits when they have a small bathroom and want to know how to make it work.
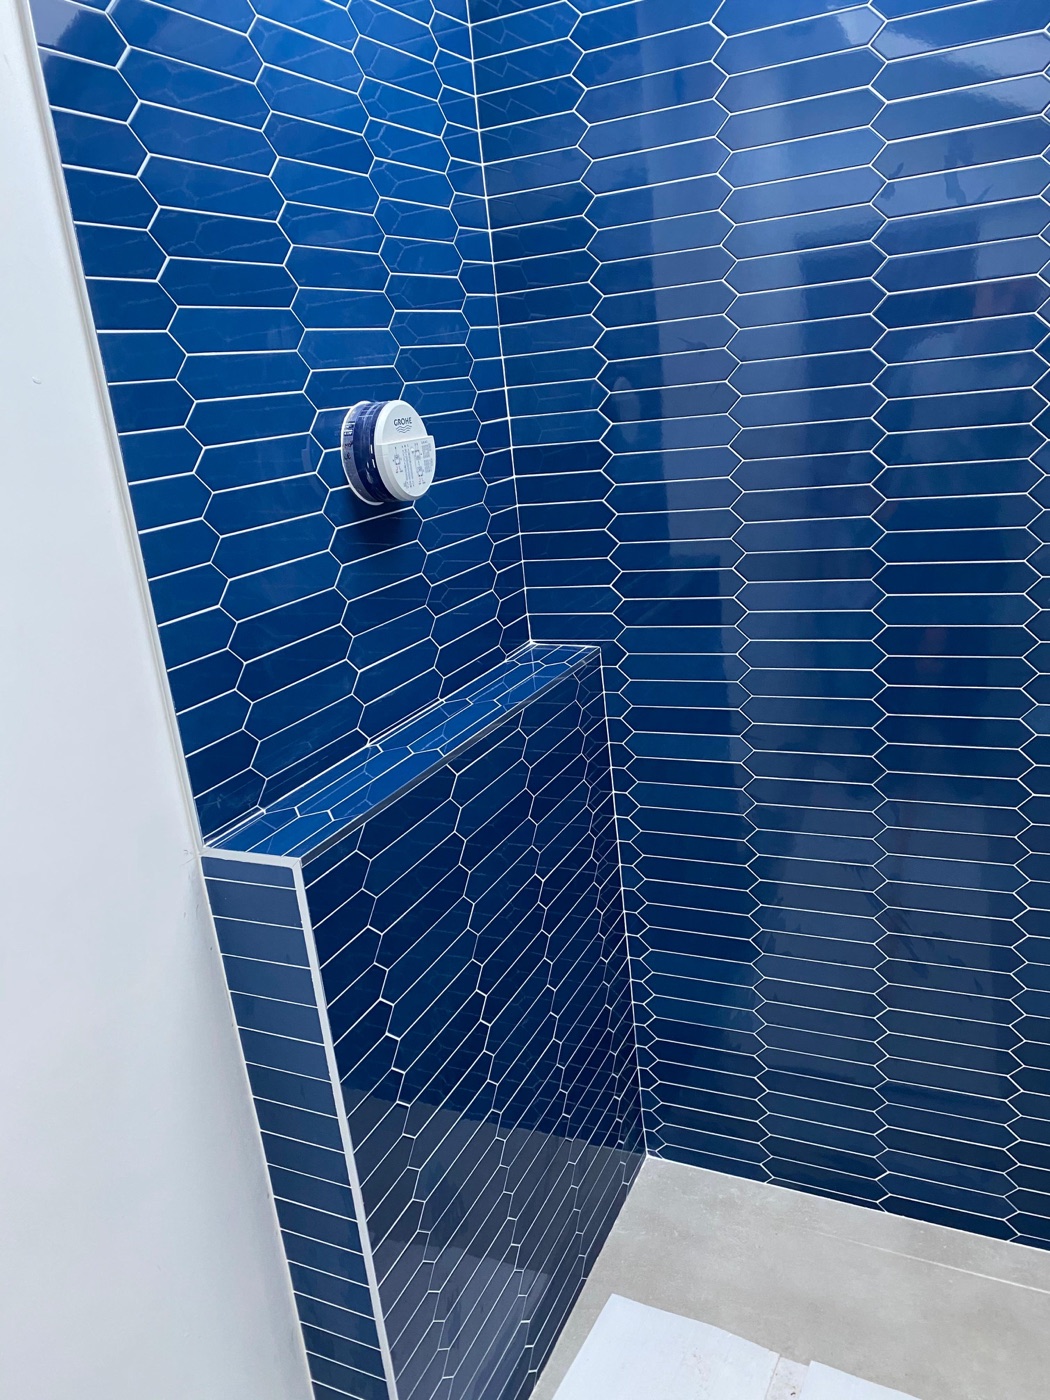 Navy hexagon bathroom, Beckenham. A small room with a confident colour direction. The dark tiles do not make the space feel smaller because they are used consistently across all surfaces. The eye reads the room as cohesive rather than fragmented. Bathroom tiling service
Rule one: fewer surfaces, not smaller tiles
The instinct in a small bathroom is to use small tiles because they “match the scale of the room”. This is wrong.
Small tiles in a small bathroom create more grout lines. More grout lines create more visual breaks. More visual breaks fragment the surface and make the room feel busier and smaller than it is.
Larger tiles with fewer grout lines read as continuous surfaces. The eye does not catch on every joint. The walls and floor feel like single planes rather than grids of tiny units.
This does not mean you should use 1200x600mm slabs in a 4 square metre bathroom. The proportion still needs to work. Medium format — 300x600 or 400x600 — is usually the sweet spot for a small bathroom. Big enough to minimise grout lines, small enough to feel proportional to the room.
The exception is mosaic tiles used as a deliberate feature on one surface (like the navy hexagons in the photo above). When the mosaic is the design statement, the high grout-line density becomes part of the look. The trick is using it on only one surface and keeping everything else simple.
Rule two: tile drenching makes small rooms feel bigger
The single most effective technique I know for making a small bathroom feel larger is tile drenching: using the same tile on the floor, all walls, and ideally the ceiling too. See the tile drenching post for the full breakdown of why this works.
The reason it works in small bathrooms specifically: the eye has nothing to interrupt it. There is no transition between floor and wall, between wall and accent wall, between materials. The whole room reads as a single contained space, and the brain stops measuring it. A tile-drenched 4 square metre bathroom feels bigger than a 4 square metre bathroom with three different materials.
This works in any colour. Light tile drenching makes the room feel airy and bright. Dark tile drenching makes it feel intimate and considered. The mistake is mixing tones — light walls with a dark floor in a small bathroom is the worst of both worlds because the contrast emphasises how small the surfaces are.
Rule three: light tiles are not always the answer
The conventional wisdom is that light tiles make small bathrooms feel bigger. This is partly true. Light tiles reflect more available light, which makes the space feel brighter. In a small bathroom with no natural light, this matters.
But the conventional wisdom misses the other half of the equation. A small bathroom with light tiles still feels small if the design is fragmented. A small bathroom with dark tiles can feel surprisingly spacious if the design is unified.
The decision should be based on:
- Natural light. A small bathroom with a decent window can handle dark tiles. A small bathroom with no window benefits from light tiles to compensate for the lack of natural light.
- The tone you want. Light tiles read as fresh, clean, airy. Dark tiles read as intimate, premium, atmospheric. There is no objectively right answer.
- What the rest of the house is like. A bright, contemporary house wants a bright, contemporary bathroom. A traditional period house can carry a darker, more characterful bathroom successfully.
Rule four: vertical lines elongate the space
If your small bathroom has a low ceiling — common in older terraces and converted spaces — vertical tile orientation helps the room feel taller.
Practical applications:
- Tall format tiles installed vertically. A 300x900 or 400x800 tile installed in vertical orientation draws the eye upward.
- Vertical brick bond. Standard rectangular tiles set in a brick pattern, but rotated 90 degrees so the long edge is vertical.
- Fluted or vertically textured tiles. The vertical grooves naturally draw the eye up. See the fluted tiles guide.
- Floor-to-ceiling installation. Always tile to the ceiling in a small bathroom. Stopping the tiles partway up adds a horizontal break that makes the room feel shorter.
Rule five: one feature, no more
If you want to introduce pattern, colour, or texture, do it on one surface only. The principle: in a small space, every visual element competes for attention. Multiple competing features create chaos.
Where one feature works:
- A patterned floor with plain walls. The floor becomes the design statement. The walls recede.
- A textured shower wall with plain everything else. The shower becomes a defined feature within the space.
- A bold-coloured feature wall behind the basin. Anchors the room visually without overwhelming it.
Where it goes wrong:
- Patterned floor + accent wall + decorative niche tiles + contrasting grout + textured ceiling. Each element on its own would be fine. Together they create visual chaos in a small room.
The discipline is restraint. Pick the one thing that matters and execute it well.
Rule six: consistent floor-to-wall transitions
In small bathrooms more than anywhere else, the transition between floor and wall affects the perception of space.
Large format coved tile bases (where the floor tile curves up to meet the wall tile) create a continuous surface that feels seamless. Common in commercial settings, occasionally used in domestic high-end bathrooms.
Matching grout colour at the floor-to-wall joint (siliconed, not grouted — see why tiles crack for the technical reason) keeps the visual flow intact.
Avoiding visible trims at the corners is preferable in small bathrooms. Mitred tile corners look more refined than chrome edge profiles. They also remove a horizontal/vertical line that would otherwise compete with the tile pattern.
What I recommend for a typical small bathroom
If a client in Bromley or South East London asks me to specify a small bathroom from scratch, my default starting point is:
- Tile choice: Medium format porcelain (300x600 or 400x600), matte finish, warm neutral tone. Stone effect or concrete effect both work well.
- Layout: Tile drenched — same tile on floor and all walls, full height to ceiling.
- Grout: Matched or one shade darker than the tile. Light grey for white tile. Mid taupe for warm neutral tile. Dark grey for grey tile.
- Feature: A single recessed shower niche, tiled inside with the same tile so it disappears into the wall rather than becoming an accent.
- Floor: Same tile, possibly oriented differently (e.g. vertical wall, horizontal floor) for subtle visual variation without breaking the cohesion.
This is a starting point. Every bathroom has constraints that change the right answer. But the principles — restraint, cohesion, fewer visual breaks — always apply.
For a free site visit and tile recommendation for your specific bathroom, get in touch. See also: bathroom tiles complete guide | tile drenching trend | matte vs gloss tiles
Got a specific question? Call me on 07990 521717 , see the bathroom tiling service, or use the contact form. I'm happy to give advice with no obligation.