Shower Tile Ideas That Actually Work: What Looks Good, What Lasts, What to Avoid
Practical shower tiling ideas for UK bathrooms in 2026. Materials, patterns, niches, layouts, and the decisions that determine whether your shower still looks good in ten years.
The shower is the hardest-working tiled surface in your home. It faces direct water, steam, thermal cycling, daily cleaning, and more physical interaction than any other wall in the house. What you choose for the shower matters more than what you choose for any other area.
This isn’t a gallery of aspirational photos. It’s a practical guide to what works, what lasts, and what creates problems in real showers — based on what I see when I install them, and what I see when I’m called to fix someone else’s work.
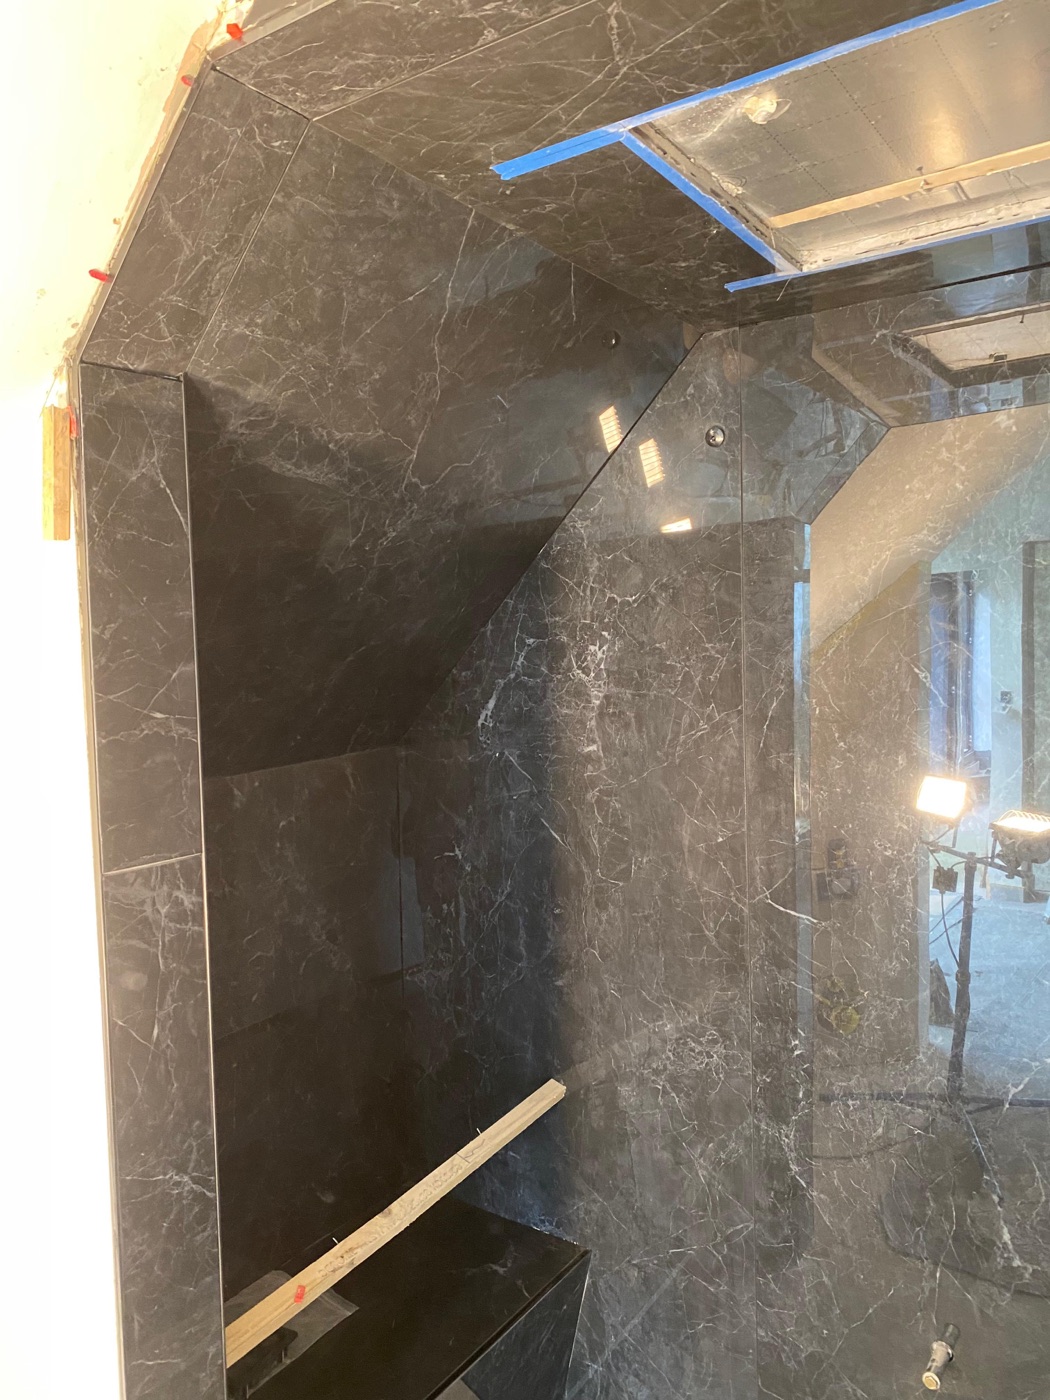 Black marble wet room, West Wickham. Full-height tiling to a vaulted ceiling. The linear drain, graded floor, and full tanking make this a shower space with no tray, no enclosure, and no compromise on waterproofing. Wet room service
Material: start here
Porcelain is the right default for most showers. Non-porous, hard-wearing, thermally stable, and available in every format and finish. A stone-effect porcelain in a matte finish gives the visual warmth of natural stone without the sealing, maintenance, and cost.
Natural stone — marble, limestone, slate — is exceptional in a shower but requires commitment. It must be sealed before grouting and re-sealed periodically. The adhesive must be a grey, non-staining type rated for natural stone. The maintenance is real. I install marble showers regularly and the result is spectacular, but I make sure every client understands what they’re signing up for. See: marble in the bathroom.
Ceramic is adequate for shower walls in lower-use bathrooms — guest en-suites, secondary bathrooms. For a main family shower that runs daily, porcelain is the better long-term choice.
Zellige in a shower is stunning but high-maintenance. The handmade surface absorbs water differently from machine-made tile, and the variation in thickness makes installation more demanding. It needs sealing and the grout needs to be carefully chosen. See: zellige tiles guide.
Layout decisions that matter
Full height or half height?
Full height. There is no good reason in 2026 to stop shower tiles at 1800mm and paint the wall above. The steam from a shower rises. It hits the painted surface above the tile line. Within a year, the paint peels, the plaster absorbs moisture, and you’re repainting annually.
Tiling to the ceiling costs more in tile and labour. It protects the wall permanently. It looks better. Every shower I install goes to the ceiling unless the client specifically requests otherwise, and even then I explain why it’s worth the extra.
One tile or two?
The simplest approach — and often the best — is running the same tile on all three shower walls, floor to ceiling. This is tile drenching applied to the shower. The lack of visual breaks makes the space feel larger and more cohesive.
Using a different tile as a feature — a niche in mosaic, a horizontal band of a contrasting colour, or one wall in a different material — can work well if it’s deliberate and restrained. The common mistake is introducing too many different tiles, which fragments the space.
Tile format
Large format (600x1200 or larger) reduces grout lines, which means fewer places for water to sit and fewer joints to clean. In a large walk-in shower or wet room, large format tiles read as luxurious and minimal. They require excellent substrate preparation — any unevenness shows under a large tile.
Medium format (300x600) is the reliable workhorse. Small enough to curve with slight wall inconsistencies. Large enough to look contemporary. The most common format in UK shower installations.
Mosaic (up to 50x50 on mesh sheets) is ideal for shower floors where you need the tile to follow the gradient to the drain. The small tile size and many grout joints grip well underfoot. Mosaic also works in niches as a design accent.
The shower niche
A recessed niche in the shower wall is one of the best practical additions to a bathroom. No shelf brackets, no suction-cup holders, no rust marks. Just a tiled recess built into the wall for shampoo and soap.
Getting a niche right requires planning. The niche dimensions need to align with the tile format so you’re not cutting tiny slivers. The interior needs to be waterproofed as carefully as the rest of the shower — more carefully, in fact, because the niche creates additional corners and junctions. The niche floor should slope very slightly toward the front to prevent water pooling.
I build niches from tile backer board (Kerdi-Board or similar), waterproofed and tiled as part of the shower wall. Pre-formed niche inserts are available but often don’t match the tile dimensions. A custom-built niche always looks better because it integrates with the tile layout.
The most common mistake I see in niches installed by others: no waterproofing behind the niche, or waterproofing that stops at the niche opening. Water sits in the niche, finds the gap, and gets into the wall behind. The damage is invisible until the plasterboard fails.
Shower floors
Shower floors need three things: slip resistance, correct falls, and appropriate drainage.
Slip resistance. A shower floor tile must have an adequate slip rating. R10 is the minimum for a domestic shower. R11 is better. Matte porcelain and mosaics generally meet this. Polished or gloss tiles do not. See: matte vs gloss tiles.
Falls. The floor must slope toward the drain. In a wet room, this gradient is built into the screed or former beneath the tile. In a shower with a tray, the tray provides the gradient. If you’re tiling a wet room floor, the gradient is approximately 1:60 — roughly a 12mm fall per metre. Getting this wrong means water pools in corners.
Drain position. Central drains require the floor to slope from all four sides, which means cutting tiles at angles. Linear drains along one wall allow the floor to slope in one direction, which is simpler to tile and looks cleaner. Linear drains have become the standard for wet rooms and walk-in showers for exactly this reason.
What to avoid
Glass mosaic on large shower walls. Glass mosaic looks beautiful in small accents — a niche, a border. Across a full shower wall, it’s cold to the touch, visually busy, and the reflective surface shows every water mark and soap residue.
Natural stone on shower floors without slip rating. Honed marble looks wonderful. Honed marble when wet and covered in shampoo is dangerously slippery. If you want stone on a shower floor, use a mosaic format with enough grout joints to provide grip, or choose a stone with a textured finish.
High-contrast grout in a shower. White tile with dark grout in a shower means every grout line shows soap residue, and the grout colour changes as cleaning products hit it unevenly. Matching grout in a shower is the practical choice. See: grout colour guide.
Stopping waterproofing at tile height. Steam rises. Moisture migrates. If the tanking stops at 1800mm but the tiles go to 2400mm, the upper portion of the tiled wall has no waterproofing. Tank to ceiling height in a shower.
For advice on your specific shower project, get in touch for a free site visit. I cover Bromley, Beckenham, Orpington, and surrounding areas. See also: wet room vs shower tray | bathroom tile trends 2026
Got a specific question? Call me on 07990 521717 , see the bathroom tiling service, or use the contact form — I'm happy to give advice with no obligation.