Open Plan Kitchen Floor Tiling: Continuous Floors, Mixed Substrates, and Getting It Right
How to tile an open plan kitchen floor that spans an extension and the original house. Substrate transitions, underfloor heating, expansion joints, and what goes wrong.
Open plan kitchen floors are one of the most common and most technically demanding domestic tiling jobs I do. The floor area is larger than any other room. The substrate often changes partway across (timber in the original house, concrete in the extension). Underfloor heating adds thermal cycling. And the whole thing needs to look like one continuous, seamless surface from the kitchen through the dining area to the bifold doors.
Getting this right requires more planning than a standard bathroom. Here is what is involved.
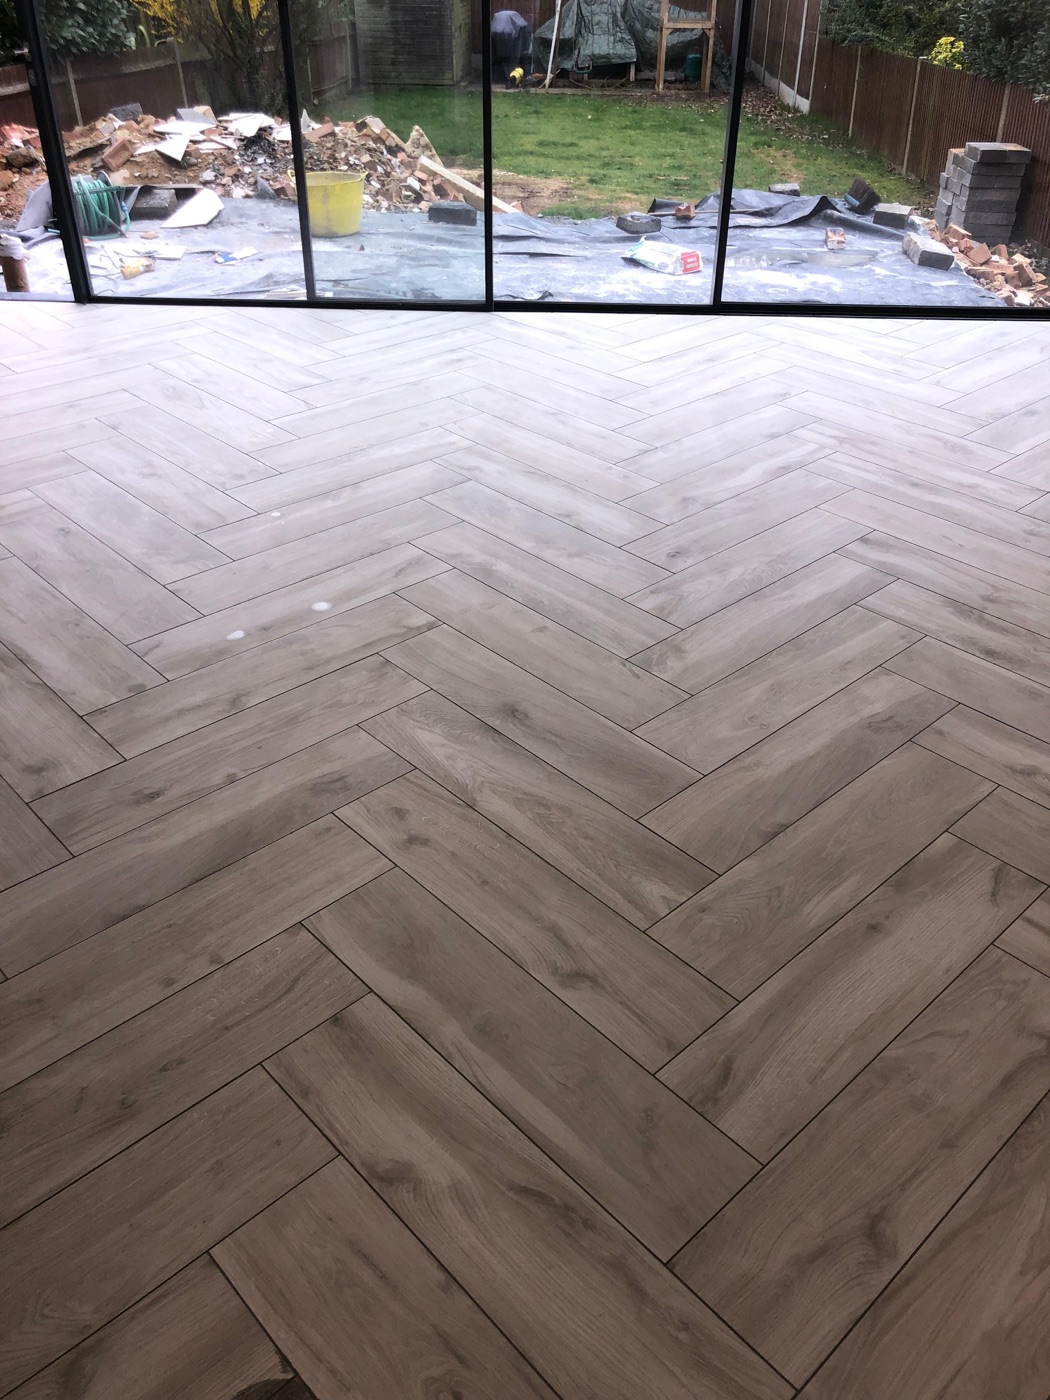 Grey herringbone kitchen floor, Orpington. Approximately 45 square metres running from the kitchen through a dining area to bifold doors. The subfloor was part timber (original house) and part concrete slab (extension). Decoupling membrane on both, expansion joint at the transition. Kitchen floor tiling service
The substrate challenge
Most open plan kitchens in Bromley and South East London are created by extending the original house. The extension has a new concrete slab. The original house has a suspended timber floor, or sometimes an old concrete floor that has settled differently.
Where the two substrates meet is the highest-risk point in the whole floor. They move differently. Timber flexes with foot traffic and expands/contracts seasonally. Concrete is rigid but may have slight settlement movement. A tile that bridges the junction without accommodating this differential movement will crack.
The solution
Decoupling membrane across the entire floor. Not just the timber section — the full floor. The membrane isolates the tiles from substrate movement in both zones and provides a consistent surface for the adhesive.
Movement joint at the substrate transition. A compressible joint (filled with colour-matched silicone or covered with a flush metal strip) at the exact point where timber meets concrete. This joint allows the two substrates to move independently without transferring stress to the tiles.
Flexible adhesive throughout. C2 S1 or S2 adhesive on the entire floor. Rigid adhesive on a floor with this many variables is a guaranteed failure point.
See: why tiles crack and our herringbone kitchen case study for a real example of this approach.
Underfloor heating considerations
Most new kitchen extensions include underfloor heating. This adds thermal cycling to the substrate demands.
Adhesive specification: Must be rated for underfloor heating. C2 S1 minimum, C2 S2 for larger tiles. Standard adhesive goes brittle under repeated heating cycles.
Expansion joints: More critical with UFH than without. The floor expands and contracts with every heating cycle. Perimeter expansion joints, intermediate joints every 8 metres, and joints at substrate transitions must all be siliconed, not grouted.
Commissioning: The UFH system must be commissioned (run at low temperature for a set period) before tiling. Tiling over an uncommissioned system risks the screed cracking during first use, which damages the tile bond.
See: tiling over underfloor heating and best tile adhesive.
Tile choice for open plan
Large format porcelain (most popular)
600x600 or 600x1200 in stone effect, concrete effect, or marble effect. Large format tiles minimise grout lines across the bigger floor area. Fewer joints means a cleaner, more continuous surface. Matte finish is practical for kitchens (hides marks, provides grip).
The trade-off: large format needs very flat substrates. On a floor that spans an old timber section and a new concrete section, this often means extensive levelling work before any tile goes down.
Wood-effect porcelain plank
200x1200 or 300x1500 planks in oak, walnut, or grey wood effect. Particularly popular in herringbone, which adds character that the stone-effect slabs do not have.
The trade-off: herringbone adds 30-40% to the labour cost because of the angled cuts at every perimeter.
Natural stone
Limestone, slate, or travertine for the kitchen floor of a period property. Stunning but demanding to maintain in a cooking environment where grease and acidic food are regular hazards.
The trade-off: ongoing sealing commitment, more vulnerable to staining, higher material cost.
Setting out: where the pattern starts
On a large open plan floor, the setting out determines how the tile layout works from every entrance point and viewing angle.
Centre line approach: Work out the centre of the room and set the pattern from there. This gives balanced cuts at opposite walls. It’s the standard approach for most rectangular rooms.
Focal point approach: In an open plan space, the main viewing direction matters more than mathematical centre. If the kitchen is viewed primarily from the dining area, set the pattern from the dining end so full tiles face the viewer.
Threshold approach: For herringbone floors, I typically set the pattern from the centre of the most visible threshold (often the bifold doors) and work inward. This means the V-pattern meets the glass at a clean, planned angle rather than an arbitrary cut.
The key principle: setting out takes time and produces no visible progress. Clients sometimes wonder what the tiler is doing for the first two hours. The answer is ensuring the other 43 hours produce a floor that reads correctly from every direction. See floor tile patterns compared.
Transition zones
Where the tiled kitchen floor meets other flooring in adjacent rooms, the transition needs a clean detail.
Tile to carpet (common at the kitchen-hallway boundary): A metal threshold strip sits at the doorway, one edge under the carpet, the other at the tile edge. Match the strip finish (chrome, brass, matt black) to the kitchen hardware.
Tile to timber (common at the kitchen-living room boundary): A reducer strip accommodates any height difference between the tile and timber surfaces.
Tile continues through (the ideal for open plan): No threshold at all. The tile runs continuously from kitchen through dining and into the hallway. This is the strongest open plan approach and the one I recommend wherever practically possible.
Floor height and doors
Two layers of material (levelling compound + tile) add height to the floor. In a new extension, this is planned for. In an existing kitchen being retiled, the additional height can affect:
- Doors. Internal doors may need trimming at the bottom to clear the new tile height.
- Appliance spaces. Integrated dishwashers and washing machines have a set clearance. Check that the new floor height does not prevent appliances fitting under the worktop.
- Thresholds to other rooms. A step up from an adjacent room to the kitchen is a trip hazard and needs addressing with a transition strip or ramp.
These are all solvable. They need identifying before work starts, not discovering when the tiler is halfway through the floor.
What I need from you before quoting
For an accurate open plan kitchen floor quote, I need to know:
- Floor area in square metres (a rough measurement is fine — I will confirm on site).
- Substrate type. Is the floor concrete, timber, or a mix? Is it the original floor or has it been modified?
- Underfloor heating. Is UFH installed? Electric or wet? Has it been commissioned?
- Tile choice. Have you selected tiles, or do you want recommendations? If selected, what format and material?
- Layout. Is the tile just for the kitchen, or continuing into hallway/dining?
- Existing flooring. Is there existing flooring to remove (vinyl, old tiles, carpet)?
With this information I can provide a comprehensive written quote that includes everything: substrate preparation, membrane, adhesive, tile installation, grouting, silicone, thresholds, and clean-up.
For a free site visit and open plan kitchen floor quote across Bromley and South East London, get in touch.
See also: kitchen tiles complete guide | kitchen floor tile guide | large format tiles guide | herringbone kitchen case study
Got a specific question? Call me on 07990 521717 , see the kitchen floor tiling service, or use the contact form — I'm happy to give advice with no obligation.