DIY Tiling vs Hiring a Professional: An Honest Assessment from the Other Side
When DIY tiling is genuinely fine, when it will cost you more than hiring a tiler, and what goes wrong in bathrooms and kitchens when people underestimate the job.
I should start by saying something that might surprise you coming from a professional tiler: some tiling jobs are genuinely fine to do yourself. I’ve told clients as much. A straightforward ceramic splashback on a flat wall with a few straight cuts is not a job that requires 44 years of experience. If you’re handy, you own a tile cutter, and you watch a decent tutorial, you’ll manage it.
But that’s not the job most people attempt when they decide to tile their own bathroom.
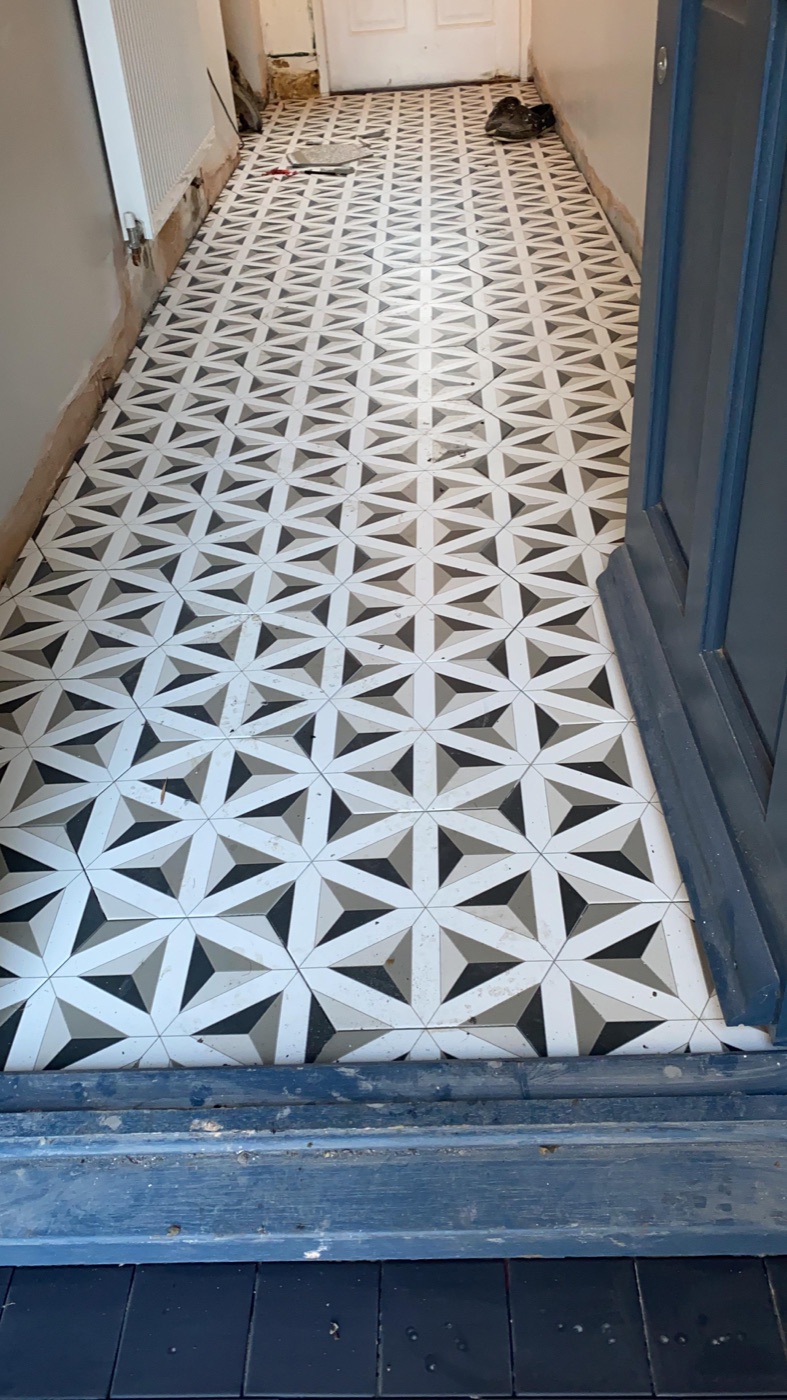 Geometric star hallway floor, Chislehurst. This is not a DIY job. The setting-out for a multi-piece pattern like this takes as long as the laying itself. A single error in the first row compounds across the entire floor. Pattern tiling service
Where DIY works
Small, dry splashbacks. A 600mm strip of tiles behind a kitchen worktop, on a flat plastered wall, using standard ceramic tiles in a brick bond or straight lay. The wall doesn’t need waterproofing. The cuts are straight. The adhesive is forgiving. If you mess up a tile, you can pull it off and re-do it before the adhesive sets.
Replacing individual tiles. If a single tile has cracked from impact and you have spare tiles from the original installation, removing and replacing one tile is a reasonable DIY job. Carefully chisel out the old tile, clean the substrate, back-butter the new tile, press it in, and grout. The tricky part is matching the grout colour.
Mosaic sheets on a small feature area. Pre-mounted mosaic sheets (tiles on a mesh backing) are designed for easier installation. On a small, flat area — a niche, a border, a feature panel — they’re manageable for a careful DIYer.
Where DIY goes wrong
The problems I see when I’m called to fix DIY jobs fall into the same categories repeatedly.
Substrate preparation
This is the one thing that separates professional tiling from DIY more than any other. When I arrive at a job, I spend the first portion of time assessing and preparing the surface before any tile goes near it. I’m checking:
- Is the plaster sound? Tap it. Hollow plaster cannot hold tiles.
- Is the surface flat? Run a straight edge across it. Bumps and dips that are invisible to the eye become visible as lippage once tiles are on.
- Is there old adhesive or paint that needs removing?
- On timber floors, does the subfloor need a decoupling membrane?
- In wet areas, does the wall need boarding and tanking?
A DIYer sees a wall, thinks it looks flat, and starts tiling. The result: tiles that sit unevenly, grout lines that wander, and — in the worst case — tiles that de-bond from a wall that couldn’t take the load.
Waterproofing
Shower enclosures need tanking. The wall behind the tiles needs a continuous waterproof membrane. The corners need fleece tape embedded in the membrane. The floor-to-wall junction needs specific treatment.
Skip this — as many DIYers do, because it’s invisible and the tiles seem to stick fine without it — and water will find its way through the grout over time, saturate the plasterboard behind, and cause it to collapse. I’ve stripped bathrooms where the plasterboard behind the tiles was black with mould and disintegrating. The tiles looked fine from the front. The wall behind them was destroyed.
The cost of tanking a shower properly is modest. The cost of stripping a bathroom that’s failed because of missing waterproofing is significant.
Cutting
Tile cutting sounds straightforward until you need to cut around a soil pipe, notch around a window reveal, or scribe a tile to fit against an uneven wall. A professional tile cutter makes this routine. A score-and-snap cutter from a hardware store makes it stressful and inconsistent.
The cuts around fixtures — pipes, electrical boxes, shower valves — are where DIY tiling most visibly fails. Rough, uneven cuts that leave visible gaps. Silicone used to fill gaps that should have been tight. Tiles cracked during cutting and installed anyway because the replacement was going to add another day to the project.
Layout and setting-out
Before a tile goes on the wall, a tiler works out the layout. Where do the tiles start? Where do the cuts fall? Are the cuts symmetrical on opposite sides? Is the pattern centred on the focal point of the room? What happens at the corners?
Bad setting-out produces narrow sliver cuts at one edge of a wall and full tiles at the other. It creates grout lines that don’t align between adjacent walls. It puts cut tiles where full tiles should be visible. These are not things you can fix after the fact. By the time you notice the problem, the tiles are set.
The cost calculation
The perceived saving from DIY is the tiler’s labour — typically £500 to £900 for a standard bathroom re-tile over two to three days.
The actual costs of DIY:
- Tool hire. A wet cutter, mixing drill, level, spacers, sponges, notched trowel. A decent wet cutter costs £100 to hire for a weekend or £250 to buy.
- Material wastage. Cutting errors, breakages, and poor layout planning mean a first-time DIYer typically wastes 15 to 25 percent of tiles, versus a professional’s 8 to 12 percent.
- Time. A job that takes a tiler two days takes a first-time DIYer a week, including the hours spent watching tutorials, correcting mistakes, and waiting for adhesive to cure because you tiled yourself into a corner.
- Correction costs. If the job fails — tiles cracking, grout falling out, water getting behind the tiles — the cost of stripping it all out and having it done properly is more than double the original professional quote.
I’m not saying this to protect my livelihood. I have more work than I can do as it is. I’m saying it because the cost of doing it badly — in money, in time, and in the damage to your bathroom — is real.
How to decide
Do it yourself if:
- The area is small (under 2 square metres)
- The surface is dry (no shower, no bath surround)
- The wall or floor is flat and sound
- You’re using standard format tiles with straight cuts only
- You’re prepared for the job to take longer than expected
Hire a professional if:
- The job involves a shower, bath surround, or wet room
- The substrate needs preparation (old tiles to remove, uneven surfaces, timber floors)
- The tiles are large format, natural stone, or expensive
- The layout involves pattern work or complex cuts
- You need the bathroom back in use within a set timeframe
If you’re somewhere in between, the most cost-effective approach is sometimes hybrid. I’ve had clients who prepared the substrate themselves — removing old tiles, cleaning the walls, installing tile backer board — and then brought me in to tile. That saved them a day of labour while ensuring the critical part (the tiling itself) was done professionally.
For a straight answer on whether your project needs a professional, get in touch. I’ll tell you honestly. Related: tile installation guide | how to spot good tiling | why tiles crack
Got a specific question? Call me on 07990 521717 , see the bathroom tiling service, or use the contact form — I'm happy to give advice with no obligation.