Bathroom Renovation Timeline: How Long Each Stage Takes and What Causes Delays
A realistic timeline for a full bathroom renovation in the UK. What happens at each stage, how long it takes, what slows it down, and how to keep the project on track.
The question I hear most often during initial site visits is not about tile choice or cost. It’s about time. How long will the whole thing take? When will I get my bathroom back?
The answer depends on the scope of work, but the general timeline is more predictable than most people expect. What is less predictable — and what causes most delays — are the things that happen before the tiler arrives and the decisions that should have been made before work started.
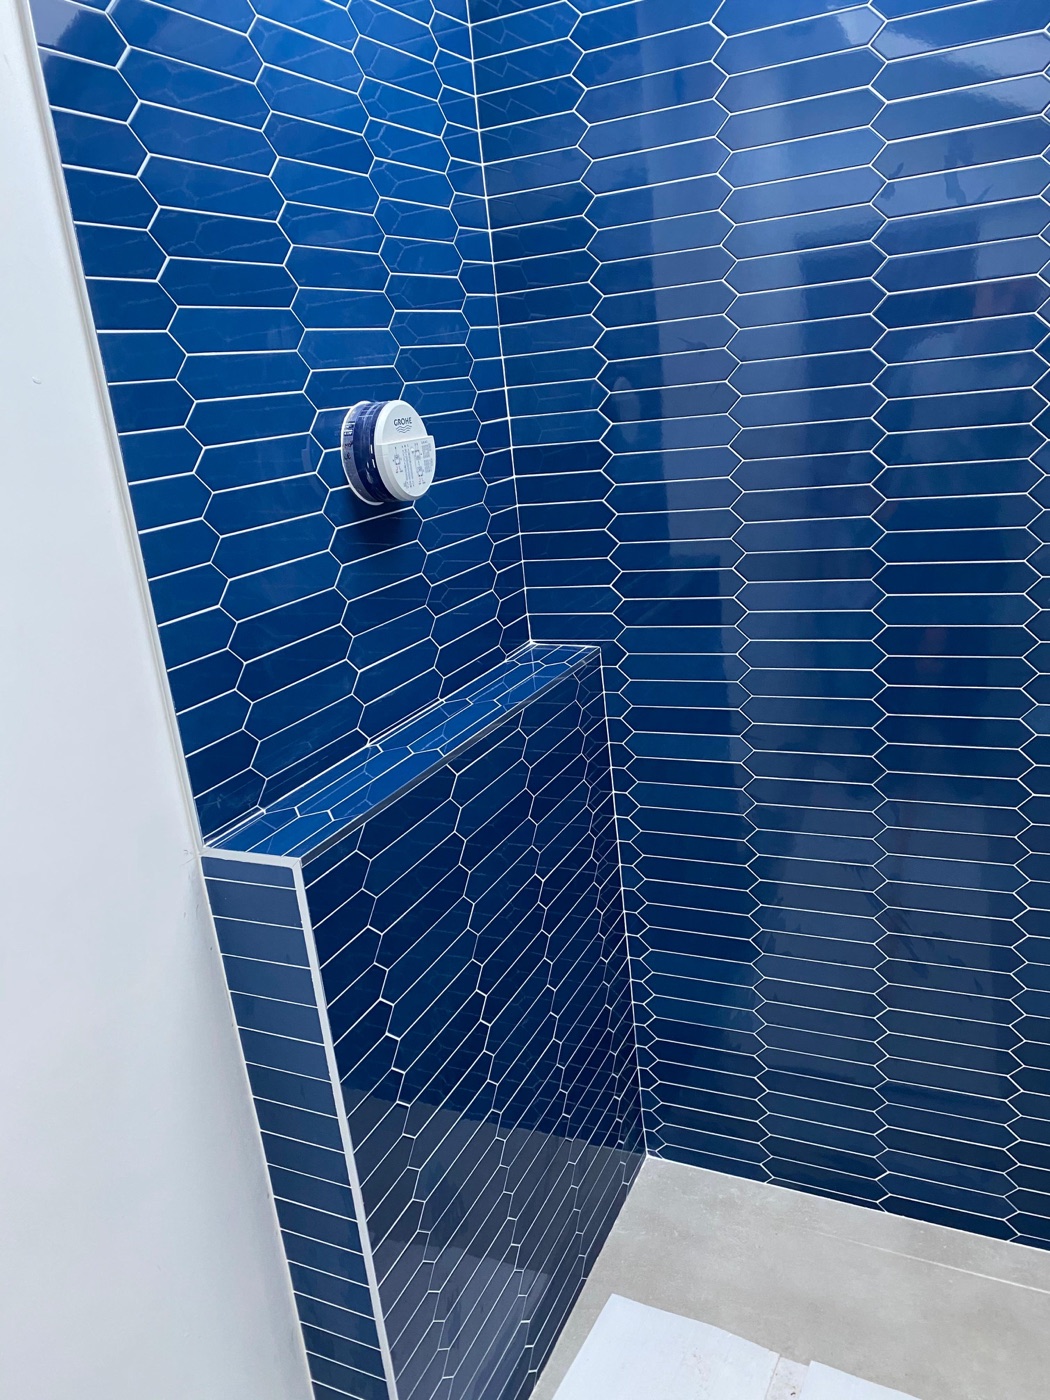 Navy hexagon bathroom with tiled bench, Beckenham. A bathroom like this — full re-tile, built-in bench, mosaic tiles requiring precise alignment — represents the tiling phase of a broader renovation. The tiling takes three to four days. The full renovation from strip-out to completion took three weeks. Bathroom tiling service
The typical timeline
For a standard family bathroom renovation — stripping an existing bathroom and fitting a new one in broadly the same layout — the overall timeline is approximately two to three weeks. Here’s how that breaks down.
Week 1: Strip-out, first fix, boarding
Day 1-2: Strip-out. Removing the old bathroom suite, tiles, and any damaged plasterboard or substrate. This generates a significant amount of waste that needs skip hire or van removal. Strip-out is dirty and noisy. If you’re living in the house during the renovation, this is the worst part.
Day 2-3: First-fix plumbing. The plumber moves pipework to the new positions for the bath, basin, toilet, and shower. If the layout isn’t changing, this is quick. If you’re moving the toilet or adding a wet room, the plumbing work is more involved and may require floor work.
Day 3-4: First-fix electrics. The electrician runs cables for lights, extractor fan, heated towel rail, and any switches or sockets that are moving. This must be done before the walls are boarded and before the tiler starts.
Day 4-5: Boarding and plastering. Tile backer board or moisture-resistant plasterboard is installed on walls. The floor is assessed and prepared. Any levelling compound is laid. In a wet room, the former (graded tray) is installed at this stage.
Week 2: Waterproofing and tiling
Day 6: Tanking. Liquid-applied waterproofing membrane on all wet-area walls and floors. This needs to cure — typically overnight — before tiling begins. In a wet room, the tanking is more extensive and may need two days for full coverage and cure.
Day 7-10: Tiling. This is my part. A standard bathroom — walls and floor, shower enclosure, straight-lay porcelain — takes two to three days. A complex job — herringbone pattern, natural stone, mosaic feature walls, built-in niches, a tiled bench — takes three to five days. The adhesive needs to cure between stages (typically overnight between floor and wall, or between wall sections in different planes), so tiling is not a continuous process.
For detailed tiling timescales, see: how long does bathroom tiling take.
Week 3: Second fix and finishing
Day 11-12: Grouting and silicone. Grouting the tiled surfaces, applying silicone at all movement joints (floor-to-wall, wall-to-wall corners, around fixtures). Silicone needs 24 hours to cure before the shower is used.
Day 12-13: Second-fix plumbing. Fitting the bath, basin, toilet, shower valve, and showerhead. Connecting waste pipes and water supply. Testing for leaks.
Day 13-14: Second-fix electrics. Fitting light switches, light fittings, extractor fan, heated towel rail. Testing and certification.
Day 14-15: Decorating, accessories, snagging. Painting the ceiling and any untiled wall areas. Fitting mirror, toilet roll holder, towel hooks, shower screen. Final snagging — checking everything works, fixing minor issues, cleaning up.
What makes it take longer
Layout changes
Moving the toilet position requires moving the soil pipe, which may mean lifting the floor. Moving the bath or shower to a different wall requires re-routing the plumbing. Every positional change adds plumbing time and potentially floor work. A complete reconfiguration of the bathroom layout can add a week to the programme.
Wet rooms
A wet room adds time at three points: the former installation (graded tray, linear drain), the extended tanking (full floor and wall waterproofing with cure time), and the floor tiling (which must follow the gradient precisely). A wet room adds two to three days compared to a standard shower installation. See: wet room vs shower tray.
Discovery work
Stripping an old bathroom occasionally reveals problems that weren’t visible before: rotten floor joists beneath the bath, corroded plumbing, asbestos in old tile adhesive, damp penetration in external walls. These need to be addressed before the new bathroom can be built, and they add time and cost that can’t be predicted in advance.
Tile complexity
Herringbone takes 30 to 40 percent longer than straight-lay. Natural stone requires pre-sealing and individual adhesive bed adjustments. Large format tiles need more precise substrate preparation. Mosaics require careful alignment across large areas. The tile choice affects the tiling duration directly.
The most common delay: materials not ordered in time
In my experience, the single most common cause of bathroom renovation delays is not trades availability or weather or unexpected problems. It’s tiles not being on site when the tiler is ready to start.
UK tile supply chains are inconsistent. Tiles that show as in stock online are sometimes out of stock at the warehouse. Popular lines sell out seasonally. Tiles ordered from European manufacturers take three to six weeks. Natural stone sourced from specific quarries can take longer.
If the tiler arrives on Day 7 and the tiles haven’t been delivered, the project stops. The tiler moves to another job. When the tiles arrive, the tiler has to fit you back into their schedule. This can delay the project by a week or more.
The solution is simple: order tiles, sanitaryware, shower fittings, and taps at least two to three weeks before the renovation start date. Have everything on site before Day 1. Check quantities — order 10 to 15 percent extra for cuts and wastage. Running short by a box and having to wait two weeks for a restock is an avoidable disaster.
How to keep the project on track
Make all decisions before work starts. Tile choice, grout colour, sanitaryware, tap finish, shower type, towel rail position. Every decision deferred to “we’ll decide when we see it” is a potential delay.
Order materials early. See above. This is the most impactful thing a homeowner can do.
Brief every trade clearly. The plumber, electrician, tiler, and decorator need to know the plan before they arrive. A simple drawing showing the layout, with positions marked, prevents misunderstandings.
Have a single point of contact. If you’re managing the renovation yourself rather than using a main contractor, you are the project manager. The trades need to coordinate through you. Dates need to be confirmed. Handovers need to happen on time.
Accept that some flexibility is needed. Even well-planned renovations have minor adjustments. A professional trade can adapt. The goal is to eliminate the major delays (missing materials, unclear design decisions) and accept that minor schedule shifts are normal.
For advice on planning your bathroom renovation, including realistic timescales for your specific project, get in touch for a free site visit. I coordinate with plumbers and electricians regularly and can advise on the full programme, not just the tiling.
See also: bathroom tiling cost London | tiling cost 2026 | tile installation guide
Got a specific question? Call me on 07990 521717 , see the bathroom tiling service, or use the contact form — I'm happy to give advice with no obligation.